Although I like Schacht’s new Zoom Loom very much, there is a better way to join squares together than the one shown.
Each square upon completion has two tails: a short one at the place where you began warping the loom, and a long one on the opposite corner where you finished up. Although the Zoom Loom instructions tell you to weave in both tails before removing from the loom, I do not see the benefit. To introduce a new yarn to join the squares with will simply create two more tails that need to be woven in and concealed. Enough already! I prefer to use the longer finishing tail on each square to join it to the next, a sort of daisy-chain all the way across the finished project, each square using its own long tail to link to the next in line. At the end I go back over and weave in all remaining tails.
First of all, it is ESSENTIAL that all squares be in 100% alignment. Each square has the two starting and finishing tails. But each square also has two remaining corners, one with a big scallop or bump and one with a little tiny bump. The big one was made on four corner pins while the little one was made on two pins. They are clearly different. These scallop/bumps are asymmetric for a reason. They function like Lego blocks, and if aligned properly the squares will all interlock perfectly and lay flat.
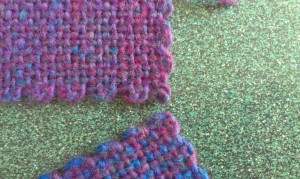
These corners are not alike! Click to enlarge, and make sure that you can tell the difference between the big and little corner bumps. The little one (the top square) is more like a twist of yarn than a properly formed scallop.
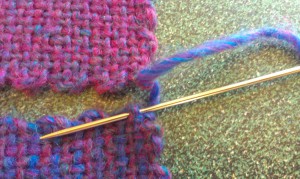
My method of joining is done by sewing with both squares flat on a tabletop. First step: align the squares properly, with long tails on upper right, short tails on lower left. Then make sure that your little bumps are on the bottom right and the big bumps at the upper left. If you don’t get this straight at the beginning, the square won’t align and you’ll have to unpick the join and start over.
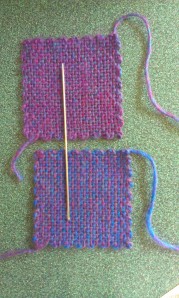
All four tails are in alignment. Big corner bumps are at top left, little corner bumps at bottom right.
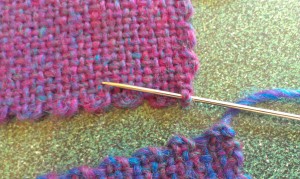
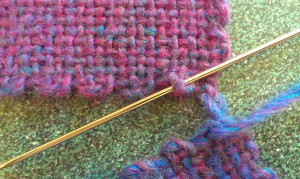
Thread the needle using the long finishing tail of the bottom square, and carefully place the point of your needle through the yarn at very center of that little bump. Throughout the entire join, you will be working from the top and will never need to place the needle into a square from the bottom.
Pull the yarn through and now address the lower square again. With your needle tip, delicately lift the two crossed yarns in the center of the same bump where you began, ignoring the other strands. Pull the yarn through.
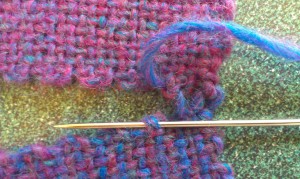
Note: except for the asymmetric bumps at each corner, all other bumps have four yarns, two of which cross over in the very center. Go back to the top square and repeat this motion, lifting the two center strands and passing the needle and yarn beneath them.
You will progress in this manner from right to left, from top to bottom and back again, over and over.
After you work your way to the far left, review your work to make sure of the alignment, then pull the yarn nice and snug, and conceal your end by weaving it in and cutting off any extra. The resulting seam will be a faintly undulating, Lego-like join that lies perfectly flat on the top surface and has gentle texture on the bottom surface. Note: if you are making any project that will be subjected to any degree of wear, it’s likely that the yarns you used for joining will eventually begin to work their way loose. I recommend stitching all finished seams on a sewing machine using a zigzag stitch in a complementary thread color, to stabilize your hard-earned seams and to prevent diagonal stretching.
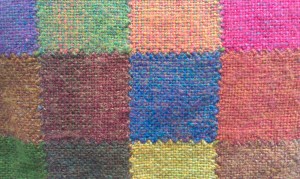
As you will see if you enlarge the photo, the zigzag stitch is nearly invisible thanks to the fluff of the wool.
Happy joining! Contact me if you have any difficulties and I’ll try to walk you through via email.
This is very helpful. Thank you! I have another question about the Zoom Loom that I’m not able to find answered elsewhere on the web so I thought I’d ask here. Do you know the best method for using more than one type of yarn with the Zoom Loom? I am trying it with ribbon for the “warp” and then a blue cottony type yarn for the “weft” and I joined them together with knots. I’m thinking there is probably a more elegant way to do it, so that no knots will have to be hidden afterwards. If you’re able to give me any insights on this point, I’d be most grateful.
Thanks for writing, Fiona! I have made over nine hundred squares by this point but have not yet figured out a way to effortlessly separate the warp and weft threads. Although joins in the yarn are inevitable when separating warp from weft, I do not recommend using a regular knot to join the two yarns together along the edge. Instead, I would use an easy-to-undo single knot. making sure I have long tails, and when the square is finished, I would undo those single knots and weave the tails back into the fabric of the square for an inch or so before snipping them off. This ensures clean “bumps” along the outer edge, without lumpy knots.
Best of luck with your project! 🙂
Could you tell me the name of the yarn you used for these squares, and what weight it is? I like the look of the fabric you’ve created in these squares. I’m thinking of getting a Zoom loom, but am wondering whether most fingering weight yarns will be too fine for it, and produce a fabric that’s more open than I want (and than I see in your images here).
Thank you.
Thanks for writing, Ted! I used Lion brand “Amazing” yarn (poly-wool singles) for all of my blanket projects, but I used Noro wool and wool/silk singles for a scarf and for my first blanket. Unfortunately, the Noro can’t take a lot of wear or it begins to pill. The Lion “Amazing” yarn is inexpensive hobby-store yarn, not sophisticated fiber-artist stuff, but it has truly glorious colorways which I mixed together with wild abandon. Long variegations (as in the “Amazing” yarn) give extremely interesting effects in the woven squares.
Basically, if you weave with fine yarns, you will indeed get a thin and web-like square. But you can double those fine yarns to beef up the weight and hardiness of your square! Combining contrasting colors as doubles can give an effective tweedy effect. But don’t use yarns that have too much heft, because you will struggle to weave the last two or three rows due to the square getting too tight. Good luck, and have fun! 🙂
Thank you!
I figured out something similar to this a year ago, but find a few of your hints made it easier. I’m in a Facebook group called Pin Loom Weaving Support, and I’ve linked back to this page several times, to spread the word. Just wanted you to know. Thanks for the clear pictures.
Thank you very much, Kathryn! I’ve wondered why that particular post always gets so much steady traffic. Many thanks to you, and I wish you worlds of fun with your own pin-loom!
all best,
Carrol